![]()
![]()
![]()


- E-mail: info@clipinhair.nl
- Customer: Not logged
- Cart: (empty)
-
Verified shop
with no risk -
All in stock
24hours dispatch -
Express shipping
worldwide -
Quality guarantee
100% human hair -
Exchange or return
within 14 days -
E-mail
info@clipinhair.nl
How to apply clip in hair extensions
Clip In Hair Extensions are perfect for those women looking for a quick do-it-yourself hair extensions method with no permanent bonding.
Clip In Hair Extensions can be applied in less then 5 minutes in the comfort of your own home, without any help from a hair stylist.
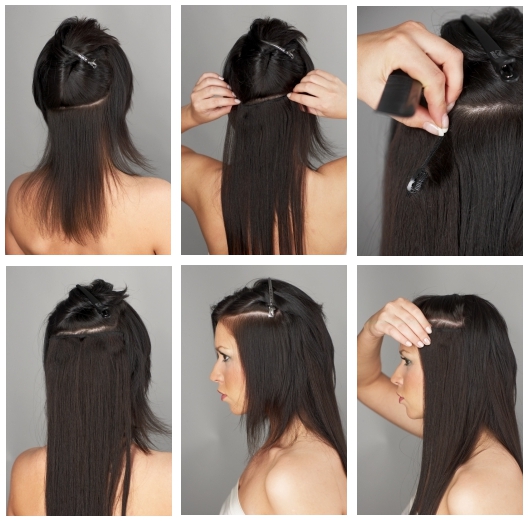
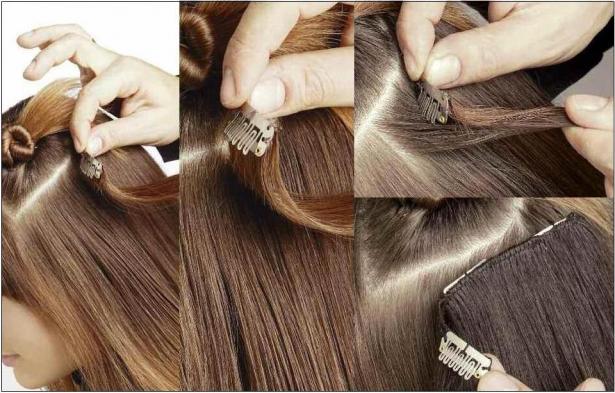
1. Before applying your clip in extensions, practice opening and closing the clips by applying pressure to each side of the clip with your thumbs.
2. Using your index fingers or a tailcomb, make a clean horizontal part across your scalp about 1 inch from the nape of your neck. Secure your hair that is above the part using a claw clip or hair tie.
3. Make sure all clips on the hair weft are in the open position.
4. Always attach the middle clip first. Slide the comb on the clip onto your natural hair and snap shut. Check if the attachment is securely in place. Repeat with the clips on the left and right side of the weft.
5. Make sure the weft lies flat along your scalp and feels secure.
6. Release the clipped hair above the part and use a comb to make another horizontal part ? to 1 inch above the previously applied extension. Once again, clip your natural hair that is above the part out of the way.
7. Attach another weft in the same manner as the first. Remember to always attach the middle clip first.
8. Continue making horizontal parts and attaching the extensions as you move up the back of the head.
9. Attach the smaller side pieces by making a horizontal part above the ear and attaching the clip in wefts in the same manner.
10. Use a mirror to make sure no visible weft is showing. Done! You can now use a hair straightener or curling iron to style your hair extensions.
-
Clip in hair
-
 Clip in hair extesions 16 inch (40cm) - straight
-
 Clip in hair extesions 16 inch (40cm) 100g - straight
-
 Clip in hair extensions 20 inch (50cm) - straight
-
 Clip in hair extensions 24 inch (60cm) - straight
-
 Clip in hair extensions 28 inch (70cm) - straight
-
 Clip in hair extesions 20 inch (50cm) - wavy
-
 Clip in hair extensions 20 inch (50cm) - curly
-
 Clip in human hair streaks 20 inch
-
 CLIP IN human hair extensions Deluxe
-
 Clip in human hair bangs / fringes
-
 Clip in deluxe package
-
 Clip in according to colour shade
-
 Hair extension according to length hairpiece
-
 Hair extension according to weight hairpiece
-
- Clip in wefts
- Clip in ponytails
-
Tape hair
-
 Tape IN / Tape Hair Extensions 16 inch (40cm)
-
 Tape IN / Tape Hair Extensions 20 inch (50cm)
-
 Tape IN / Tape Hair Extensions 24 inch (60cm)
-
 Tape IN / Tape Hair Extensions 20 inch (50cm) wavy
-
 Tape IN / Tape Hair Extensions 24 inch (60cm) wavy
-
 Tape IN / Tape Hair Extensions 20 inch (50cm) curly
-
 Tape IN / Tape Hair Extensions 24 inch (60cm) curly
-
 Invisible Tape in - Remy AAA 50cm
-
-
Micro ring hair
-
 Micro ring human hair extensions 16 inch (40cm)
-
 Micro ring human hair extensions 20 inch (50cm)
-
 Micro ring human hair extensions 24 inch (60cm)
-
 Micro ring human hair extensions 20 inch (50cm) wavy
-
 Micro ring human hair extensions 24 inch (60cm) wavy
-
 Micro ring human hair extensions 20 inch (50cm) curly
-
 Micro ring human hair extensions 24 inch (60cm) curly
-
-
Nail tip hair
-
 Nail tip / U tip hair extensions 16 inch (40cm)
-
 Nail tip / U tip hair extensions 20 inch (50cm)
-
 Nail tip / U tip hair extensions 24 inch (60cm)
-
 Nail tip / U tip hair extensions 20 inch (50cm) wavy
-
 Nail tip / U tip hair extensions 24 inch (60cm) wavy
-
 Nail tip / U tip hair extensions 20 inch (50cm) curly
-
 Nail tip / U tip hair extensions 24 inch (60cm) curly
-
- Accessories
- Supplements
Free bonus
Extra gift in total value 16 USD
For every order over 40 USD.
Clipinhair on Facebook
Clip in before and after
Clip in apply
Accepted cards

Share us
![]()
![]()
Copyright © 2024 Clipinhair.nl. All right reserved • Webdesign - Broucek-a-beruska.cz